Jackstays (Lifelines): What you Need to Know
Jackstays, also known as Lifelines, are laid along the deck,and fixed at either end so you can clip onto them with your harness tether.
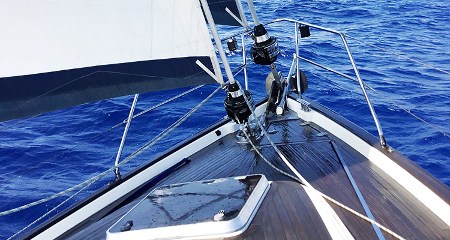
The terminology around these deck lines and harness tethers, along with the guard wires that pass around the stanchions that make up your guard rails, can be a little confusing because sailors can use either or even all three to mean the same thing. To clarify what I will be writing about and hopefully to avoid any confusion, I have listed them below under what we call them here in the UK, but I have included some other popular alternative terms as well:
Jackstays:
- webbing, wire or rope laid along the deck for clipping to with your personal tether – also known as jacklines, lifelines or deck safety lines.
Guard Wires:
- wire or fibre running between your stanchions to form a balustrade around the deck – also known as lifelines or guard rails.
Safety Lines:
- the tether you use to attach yourself from your harness (which is commonly integral to your lifejacket) to the yacht – also known as safety tethers, harness lines or lifelines.

What can Jackstays be made up with?
Jackstays can be made from rope, wire, or webbing, but webbing is by far the most popular solution nowadays. Traditionally, 1×19 stainless steel wire, either plain or PVC coated, was the most common method. Webbing is now the go-to solution. Recently, 100% Dyneema 12 strand rope has become more popular.
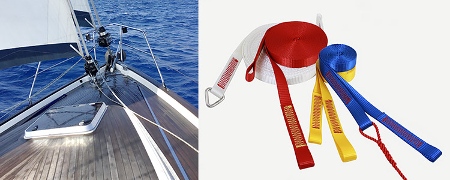
The Advantages of Webbing
High Tenacity Polyester Webbing:
- lies flat on the deck, so it does not move or roll under your feet.
- will not mark or damage your deck.
- is kind to the hands.
- is ergonomic when it comes to clipping on with your safety tether hook.
- will break your fall because it has some ‘give.’
- can be attached with shackles, lanyards, a webbing three-bar slide (or two for peace of mind) a purpose-designed and manufactured jackstay webbing adjuster or a cow hitch (at one end only).
- Jackstay webbing is high denier, high tenacity webbing and should have a minimum break load of 2000kg. This compares favourably with stainless steel wire.
- lasts well in the sun if you specify high denier Polyester, and not Polyamid (nylon)
- resists chafing exceptionally well while on deck, although you should take care to route the jackstays so that they do not rub against any potential wear points – some ‘fluffing’ of the edge fibres through natural wear and tear is normal.
- can be visually checked for signs of UV or physical damage.
A note here on UV endurance – the strength of the webbing depends on the duration of exposure and the strength of the sun’s harmful rays.
The deterioration will be gradual, and the first indications will be fading of any dye (colour)
It is good practice to stow webbing jackstays below when the yacht is not at sea to maximise their working life.
The Disadvantages of Webbing
There are only a few downsides, but webbing:
- will not last as long in the sun as stainless steel wire, although it will fare a little better than Dyneema.
- is more susceptible to damage or wear and tear than wire.
- requires more frequent adjustment to maintain the correct tension.
The Alternatives to Webbing
Stainless Steel 1×19 Wire

- Plain, uncovered 1×19 has a smooth finish, but 4mm only has a breaking strain of 1400kg which is significantly lower than a typical harness safety line, so the diameter should be a minimum 5mm.
- Plain wire has excellent abrasion and UV resistance, although PVC will deteriorate in the sun.
- If you prefer PVC coated stainless steel wire, this will increase the diameter from 5mm to 8 or 9mm which is then a significant roll hazard.
- may require clunky terminations.
12 Strand 100% Dyneema
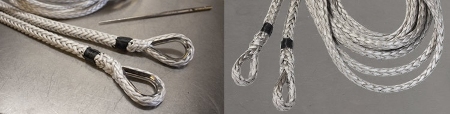
- is extremely strong e.g. 5mm diameter Hampidjan’s DynIce Dux has a spliced break load of 4300kg.
- is yielding underfoot (squashy )
- lasts well in the sun and can be treated with Polyurethane to enhance UV resistance.
- Can be sleeved with polyester tube webbing to protect it from the sun and further reduce any chances of rolling underfoot.
- can be spliced onboard if you trust your own handiwork.
- offers a variety of different splicing terminations for adjustment or cow hitch at one end.
Strength Comparison for Stainless Steel Wire, High Tenacity Jackstay Webbing and 12 Strand 100% Hollowbraid Dyneema
- 4mm 1 x 19 stainless steel wire, MBL = 1400kg
- 5mm 1 x 19 stainless steel wire, MBL = 2190kg
- High Tenacity Polyester Jackstay Webbing, MBL = minimum 2100kg, can be up to 3000kg
- 5mm LIROS D Pro Static = 2450kg
- 5mm Hampidjan DynIce Dux 4800kg (strength after professional splicing = 4300kg)
Jackstay Fitting Considerations
Safe Attachment and Detachment
It is essential that your jackstays are set up so that you can clip on before you leave the cockpit and be able to venture as far forward (and aft) as possible without having to unclip, even temporarily.
The jackstays will need to run past the cockpit adjacent to the coaming so that they are within safe reach. They also need to avoid any obstacles on deck such as opening hatches, running rigging lines and cleats, passing inside the shrouds to provide a clear pathway to the foredeck (or after deck)
Overboard Casualty Prevention
The jackstays should be fitted as near to the centre line as practicable to minimise the risk of falling over the rail while still attached, typically following the curve of the coach roof, although this may still be too near the guardrail for comfort.
Jackstays routed too close to the gunwale or toe rail may not prevent a fall into the water, especially on the lower, leeward side with the yacht heeled over.
If the jackstay line is near enough to fall over the rail while clipped on, it will be well worth considering shorter tethers to limit the distance.
There are three hook versions of the safety line tether which typically have one shorter tail. Three hooks are essential for staying clipped on when transferring from the jackstay to another fitting.
N.B. The MAIB Safety Bulletin 1/2018 states that jackstays should be routed to minimise the possibility of a safety clip hook getting trapped underneath any deck fitting, and mooring cleats in particular, see the quote below:
“SAFETY LESSON – To prevent the strength of a safety harness tether from becoming compromised in service due to lateral loading on the tether hook, the method used to anchor the end of the tether to the vessel should be arranged to ensure that the tether hook cannot become entangled with deck fittings or other equipment.”
Measuring your Jackstays
All jackstays should be fitted so that there is a degree of lift in the centre of the line before any significant load is applied. The correct amount of lift will depend on the stretch properties of the jackstay material and should be proportional to the overall length of the jackstay.
Wire does not stretch at all, so wire jackstays should be fitted with some slack to create the requisite lift. The strain on the end fittings caused by a heavy casualty falling against the middle of a bar-tight wire with their full body weight could be dangerously excessive.
Conversely, polyester webbing does stretch, so the jackstays should always be kept taut to prevent you from falling too far, which may require regular adjustment. Pulling your safety tether tight against the jackstay may add some control to your balance in wavy conditions.
Dyneema has very low stretch, a bit more than wire but not as much as Polyester webbing, so the same principles apply as wire.
A jackstay that is too taut may leave no gap underneath, rendering the clipping on of the safety hook trickier than it needs to be.
Jackstay Attachment Point Selection
Jackstay strong points should be selected according to the principles mentioned above in the sections on Fitting Considerations and Overboard Casualty Prevention
If there are no suitable fixing points where they are needed, it is not advisable to make do with existing fittings that do not adhere to the principles mentioned above, it will be preferable to fit some purpose-designed U Bolts or Eye Bolts in the correct position.
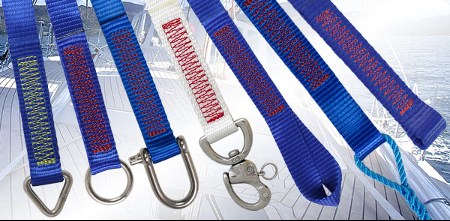
Webbing Jackstay Terminations
Making do with machine stitching not designed for the purpose, or even sewing your own webbing, is not advisable if you want to feel confident about venturing out from the safety of the cockpit in rough weather.
Once you have found a reputable source for the webbing and the stitching, there are several different options for sewing loops in the ends:
- Small Sewn Loop – for attaching to a shackle
- Small Sewn Loop with a stainless Ring, D Ring, or Triangle included
- Large Sewn Loop – with room for multiple turns of a lanyard
- Twisted Sewn Loop – for creating the perfect cow hitch
Twisted loops are for creating a cow hitch attachment in one end – pass the other end around a strongpoint and back through the twisted loop – allowing the hitch to sit comfortably around the deck fitting.
Of course, you could simply take a length of webbing and add a specially designed jackstay adjuster at each end. Makefast UK and Wichard France manufacture them, to name a couple.
Webbing Jackstay Adjustment
Jackstays can be attached to strong points such as Deck U Bolts with extra-wide shackles, but they are not such a clever idea at both ends because that will make the measuring critical and obviate any adjustment.
Lanyards at one end make the initial measuring, deployment, and adjustment more straightforward.
As an absolute minimum, the lanyard will require the amount of turns to ensure a break load comparable to the sewn webbing and the spliced rope.
Six Basic Steps to Specifying Your Jackstays
- Do your research.
- Settle on webbing, wire, or rope.
- Establish the best endpoints and the most practicable route on deck.
- Choose suitable terminations.
- Decide how you want the ends finished and attached.
- Measure carefully.
…………………………
![]()
About the Author
Jimmy Green Marine is a family-run business founded by brothers Alistair and Mike Green, based in the coastal fishing village of Beer in East Devon. The company started as a Mail Order Chandlers in 1981 and has continually evolved from attending Boat Shows and Boat Jumbles in the early days to now trading globally online.
Four decades of exporting experience combined with an intuitive website shipping calculator means that you can have your order delivered to your home, business or direct to your yacht anywhere worldwide.
Their flagship, innovative Custom Build website system provides an instant quote for all your professionally spliced and finished wire and rope rigging, mooring and anchoring solutions.
You can access this online from wherever you can get an internet connection, however remote.
Alistair Green is an experienced sailor and rigger with over 40 years of experience in the marine industry. He is passionate about providing his customers with the best possible products and services and is always looking for new ways to improve the business.
If you are looking for a reliable and experienced marine supplier, then Jimmy Green Marine is the perfect choice.
Visit their website today to learn more about their products and services.
…………………………
Related Links:
- About Jimmy Green Marine
- Custom Splicing, Rigging and Sewing Service
- Worldwide Shipping
- Jimmy Green Marine joins Noonsite.com as Premium Advertising Partner (April 2023)
Other Articles by Jimmy Green Marine:
- Running Rigging – Know your Ropes (February 2024)
- Anchors – What to Consider when Buying or Replacing an Anchor (January 2024)
- Bridles – Extolling the Virtues of V-Shaped Bridles (December 2023)
- Mooring Lines – Horses for Courses (November 2023)
- When to Replace your Standing Rigging (October 2023)
- Ten Reasons to Whip and Stitch Your Ropes (September 2023)
- How to Choose your Next Anchor Chain (August 2023)
- How to Choose a New Halyard (July 2023)
- The Uses and Benefits of Rope Splicing Onboard a Yacht (May 2023)
………………………………
The opinions expressed in this article are the author’s own and do not reflect the view of Noonsite.com or World Cruising Club.
………………………………
Find out all news, reports, links and comments posted on Noonsite, plus cruising information from around the world, by subscribing to our FREE monthly newsletter. Go to https://www.noonsite.com/newsletter/.
Leave a comment
You must Login or Register to submit comments.